Jan Seguda, Team Manager Product Management at ColorGATE, says that in a visually over-stimulated world, more consumers will seek out tactile experiences in their printed products.
How do I manage haptics production for UV digital imaging?
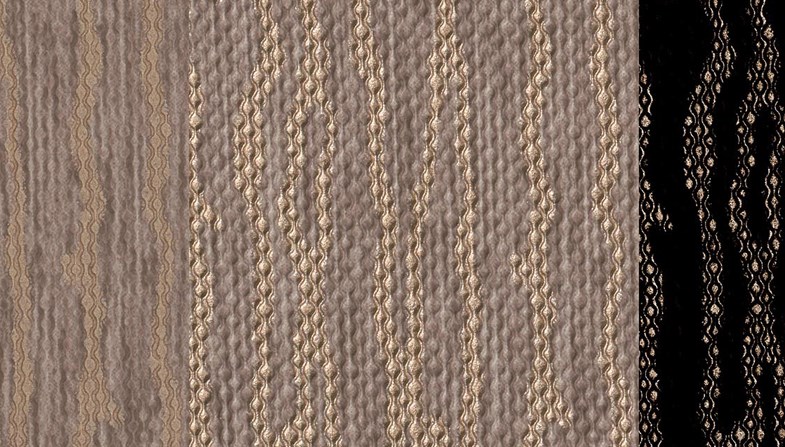
Proper haptics production starts at the creative stage. Here, you should either digitise an analogue product already produced conventionally, or start your design process by digitising a pattern, for example a wooden structure that you find in nature. To achieve this, ColorGATE created a unique 3D capturing solution with our partner Metis SRL, which manufactures high-quality industrial scanners: the 3D Surface Director.
The Surface Director consists of digitising hardware and a complete software suite to capture, transform and output complete surface description data. This allows real colours, textures and reflections to be transformed into new, exciting surfaces for products, be it a classy mobile phone cover, luxury packaging, signs, flooring products and much more.
What technology and processes do you use?
The digitisation hardware is a scanner from Metis, which was developed for the special needs of the decor market. In particular, the DRS series as well as the PM3D scanners generates unique image quality through true optical resolution, sharpness, lack of aberrations and/or noise in the images, geometric accuracy, colour fidelity and consistency of performance over the whole area of acquisition and time duration. With the unique implementation of the 3D Photometric Stereo principles, it is possible to generate high-resolution 3D data directly from the 2D colour information, removing the need for a dedicated 3D capture device and ensuring that the colour and texture of the object is always in perfect register.
Another technology is the generation of specular data, which opens the door to a variety of new possibilities: for example, the ability to easily create a spot channel for varnish or metallic printing layers.
How do I optimise for output?
With the Light Inspector software, SuperScan data can be customised in its appearance as well as optimised for print output: for example, flattening or compressing height information into a printable size. A SuperScan is a special acquisition mode in which the scanner automatically repeats several acquisitions of the original with different lighting settings. As a result, you can remix light directions and intensities without rescanning the original; this is done by changing the light direction and intensity parameters. The result is previewed in real time on the screen. This is a very useful feature since it allows rapid discovery of the ideal results with no need to rescan the original several times. Once an appropriate result has been found, the user can export it into standard TIFF format.
With our high-performance RIP Productionserver, it is then possible to import this file and create print data in the required format and specifications for the desired output. It supports all common colour modes in any resolution including special colour information for primer, white, gloss or varnish. Thanks to our unique Rapid Measure Technology it is also possible to convert the scanner into a colorimeter and use it as an ultra-fast tool for ICC characterisation of any printing system. With this – as well as with many workflow and output management modules available – it is possible to ensure optimal colour matching, accurate reproduction and maximum efficiency for texture print production.
How can I produce artwork for UV digital printing of textures to simulate wood, stone, etc?
First of all, you need appropriate data. This can be created with the digitising hardware that comes with the Surface Director: for example, by scanning the surface characteristics of a template including 3D information and, if desired, gloss. These files can also be retouched in Photoshop in order to correct flaws, carry out colour changes or combine structures.
After that, you must consider on which printing system the haptic design should be produced. What is the maximum height you can or want to achieve? How long will the printing process take? This might result in restrictions on the number of layers used. The data is now optimised for the planned print output in the Light Inspector Software and slicing can be carried out. Slicing means splitting the 3D information into individual layers, which must later be printed on top of each other to achieve a haptic effect.
The printing system should then be calibrated to achieve predictable and desired results and, if necessary, to ensure reproducibility. This can be done quickly and easily with the Productionserver tools. Finally, the data must be translated into the required format for the printer, colour transformations must be carried out, the resolution must be adjusted, the respective colour channels must be assigned to the correct inks and much more. This work is also done quickly and easily by the RIP software. Now the design is ready for production.
How do you attain a common colour appearance in wide format across a variety of substrates?
In general, this is done by ICC profiles, since even identical printers of the same series deliver different colour results for the same print data because of variations, for example in the components during their production. However, creating individual profiles for each printer and each substrate – and keeping them up to date – requires an enormous amount of effort and expertise. In addition, fluctuations in measuring the colour, differences in gamut size, and so on, usually result in slight differences even here. With ColorGATE’s Media and Device
Synchronisation, on the other hand, it is possible to synchronise several similar systems in such a way that identical results are achieved. In doing so, one printer is defined as a reference and other printers are adjusted to this reference state in order to compensate for colour deviations. This allows optimal fleet management and consistent results in print output with a manageable effort.